updating to Visual Studio 2015 RC
Mon May 25, 2015 in Development using tags Development , Visual Studio , DotNetUpdating from VS2015 CTP6 to RC
A number of changes have been made to names.
Watch this for further details:
Video: ASP.NET 5 Community Standup - Mar 10th, 2015 - The Big Rename
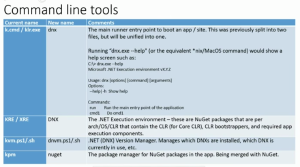
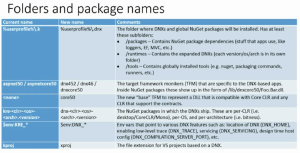
Key slides:
If you install visual studio, the DNVM and DNX will be setup for you.
To install Visual Studio RC, first uninstall visual studio CTP 6.
If you aren’t installing visual studio, and want to use the command line to install .NET Version Manager (DNVM) run the following command, you’ll need Powershell V3 for this.
@powershell -NoProfile -ExecutionPolicy unrestricted -Command "&{$Branch='dev';iex ((new-object net.webclient).DownloadString('https://raw.githubusercontent.com/aspnet/Home/dev/dnvminstall.ps1'))}"
Then to install .NET Execution Environment (DNX) run the following command
dnvm upgrade
I got some warnings, to remove the old environmental variable KRE_HOME
WARNING: Found a KRE_HOME environment variable. This variable has been deprecated and should be removed, or it may interfere with DNVM and the .NET Execution environment
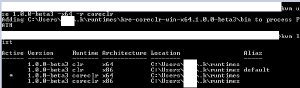
To see what is installed, and what is the default run.
dnvm list
To set the coreclr to be used run
dnvm use 1.0.0-beta4 -x64 -r coreclr
Then to run the web server
dnx . web
When running “dnx –watch . web” from the command line, when any code changes are made, the server will stop, but not restart.
In order to get the server to restart after a code change something like this is needed.
When using visual studio this is all handled for you.
@powershell -NoProfile -ExecutionPolicy unrestricted -Command "for(;;) { Write-Output \"Starting...\"; dnx --watch . web }"setting up Visual Studio 2015 CTP 6
Sun Mar 8, 2015 in Development using tags Development , Visual Studio , DotNetGoals
- To setup Visual Studio 2015 to run an asp.net vNext website
- Rather than using an Azure pre-configured VM, I wanted to setup Visual Studio on my own hardware.
How to do it/What I learnt
Reading the Release Notes
NOTE: Visual Studio 2015 CTPs are for testing and feedback purposes only. This release is unsupported and are not intended for use on production computers, or to create production code. We strongly recommend only installing this release in a virtual machine, or on a computer that is available for reformatting.
So a VM should be used. So I downloaded Microsoft Virtual PC, only to remember when the VM tried to boot up that it doesn’t work on 64 bit PCs. So starting again, I downloaded VirtualBox
I then created a Windows 7 VM in VirtualBox.
Important Steps, create it with enough space, e.g. 50GB+. It’s surprising how much space need for Windows & Patching, as well as Visual Studio 2015.
In fact to start with I allocated too little space, and had to change the amount of space the VM had allocated, as run out of space while patching the VM.
Here is good article if need to change the space on the Virtual Box VM, and update windows to use the extra space.
The first steps about cloning are optional.
The important steps are, after having turned off the VM, to issue the following command to change the hard drive size:
VBoxManage modifyhd "VMName.vdi" --resize 50000
And then after boot it back up again, to go into Control Panel, Administrative Tools, Computer Management, Disk Management, select the active partition want to expand, right click and select “Extend Volume..”, and allocate the extra space.
Now you’ve got a Windows 7 VM, few important things:
- Patch it to include SP1
- Patch it to include IE10/IE11
- Just patch it up to the latest version & reboot
If you don’t patch it to SP1, then won’t be able to install Visual Studio.
And if you don’t patch it to IE10/IE11, which you get a warning for which I ignored to begin with, I found Visual Studio wouldn’t load the K runtime/allow you to debug or browse an ASP.NET vNext website. I end up on this forum thread
Summary just patch your VM to the latest version
Having got a Patched VM, with enough disk space. Then install Visual Studio 2015 CTP 6. I used the Visual Studio 2015 Ultimate Web Installer released on 23rd of February 2015. And just installed the default options.
You’ll also want to install the K runtime.
First install the K Version Manager(KVM) in Powershell as an administrator.
@powershell -NoProfile -ExecutionPolicy unrestricted -Command "iex ((new-object net.webclient).DownloadString('https://raw.githubusercontent.com/aspnet/Home/master/kvminstall.ps1'))"
As detailed on the Asp.net Github page
Now KVM is installed, you’ll want to get the K runtime.
kvm upgrade
Having done that you can see what is installed by calling
kvm list
And you should see something like:

Notice is used the \.k\ folder, earlier version where using \.kre\. You may read older documentation that refers to \.kre\.
You may want to look at switching to use the coreclr runtime as the Active version.
kvm use 1.0.0-beta3 -x64 -r coreclr
followed by
kvm list
And you should see something like, notice the Active * has now updated:
Now you’ve got a VM, K runtime setup.
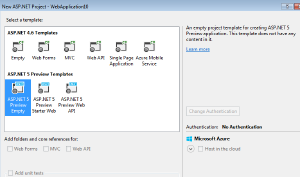
Open up visual studio and create a new project.
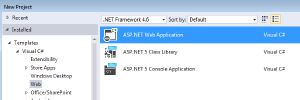
Select a blank project
Now have that created, let’s setup the welcome page for ASP.net Vnext. Open startup.cs, and add the following line
app.UseWelcomePage();
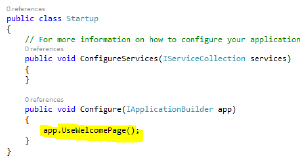
This won’t compile at the moment as you don’t have a reference to the extension method.
To do that open project.json, and add a reference to “Microsoft.AspNet.Diagnostics”: “1.0.0-beta3”
I’ve also added some references to “Microsoft.AspNet.Hosting” & “Microsoft.AspNet.Server.WebListener”, and added the command “web”, so can launch the site from the command prompt.
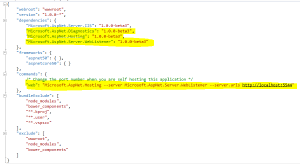
Make sure the version of k runtime in the project.json matches what you have installed, e.g. “1.0.0-beta3”.
When you save the file, visual studio should automatically restore the packages from NuGet.
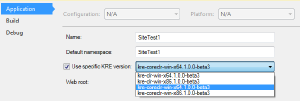
In visual studio you can configure which version of K the application uses
You should either now be able to launch the site from either Visual Studio or Command prompt.
To start the site via command prompt, navigate to the website directory, and run
k web
Now you can navigate to the site as defined in the project.json configuration